Monday, September 6, 2010

Frankenstein Treat Bags

I think these Frankenstein treat bags are just too cute. I made the treat bags with the Top Note die and Big Shot Machines from Sizzix by Stampin' Up! These would make a great little treat for classmates or even co-workers. They are relatively simple and fast to make.

If you would like a Project Instruction Sheet, CLICK HERE and view Project 040_Frankenstein Treat Bags
Thursday, September 2, 2010

Sunflower Friendship Card

I would have never thought about using a scallop punch and a hole punch to create a sunflower; but it totally works. Simply punch out a scallop circle and cut at each scallop. Sponge on some brown around the edges and then adhere small circles cut from brown cardstock with a small hole punch.

This project uses a few stamp sets from Stampin' Up!. The background was made from the Confetti and Itty Bitty Bits stamp set and the sentiment is from the Upsy Daisy stamp set. The Stampin' Up! colors used in the project were Early Espresso, Pear Pizazz, Daffodil Delight and Baja Breeze. I think this is a really great color combination.

Tuesday, August 31, 2010

Halloween Bucket Using Batty for You

I'm ready for Fall and all of the upcoming holidays!! In honor of Fall being right around the corner I thought that I would feature a Halloween project. This project uses the Batty for You stamp set from Stampin' Up! This is an awesome Halloween stamp set and it is very versatile!

Sunday, August 29, 2010

Altered Notebook with Baroque Motifs

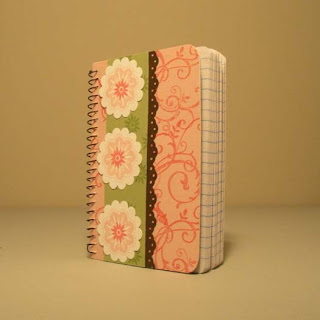
For the past few weeks, I have been featuring a specific stamp set for an entire week. I found this to be stifling my creativity so I have decided to go back to my old format which consisted of making the projects that I feel like with the stamp sets that fit with the overall designs. This project is an altered notebook. I covered the spiral bound notebook with card stock and embellished the front. This would make a cute gift for someone in the office or for someone who likes to journal.

All of the images were stamped with the Baroque Motifs stamp set from Stampin' Up! I also used the following colors in the project: Blushing Bride, Regal Rose, Pear Pizazz and Early Espresso. I think this project turned out pretty cute!

If you would like a Project Instruction Sheet, CLICK HERE and view Project 038_Altered Notebook with Baroque Motifs

Saturday, August 28, 2010

Crazy Circles with Animal Stories

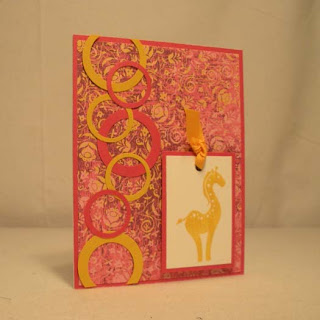
Happy Saturday! This is the last project in the series that uses the Animal Stories stamp set from Stampin' Up! I created the circles by punching first with a smaller punch and then punching around the pre-punched hole with a larger circle punch. This is a great way to make a border if you don't have a border punch. The background paper is actually retired Stampin' Up! Designer Series Paper (sorry!). I really miss the In Colors from the previous catalog; however, I am learning to love the new In Colors. I especially like Pear Pizzaz and Blushing Bride. A couple of my projects next week will feature those colors.

Wednesday, August 25, 2010

Many Happy Hearts with Animal Stories

This is another card I used with the Animal Stories stamp set from Stampin' Up! I also used the Curvy Verses stamp set as well. The colors used in this project were Perfect Plum, Old Olive, Orchid Opulence (retired) and Whisper White.

Sunday, August 22, 2010

How to Use the Stamp-a-ma-jig

I have had several customers inquire on how to use the Stamp-a-ma-jig. Here is a great YouTube video on how to use the tool.

Gate Fold Card with Animal Stories

First, I want to apologize for the photo quality. I didn't realize this photo was blurry until I uploaded the photo. Anyway, this week I will be focusing on the Animal Stories stamp set from Stampin' Up!

This project is a gatefold card. I really enjoy making gatefold cards because they are a bit more unique, but really easy to make. In addition to using the Animal Stories stamp set, this project also uses the Eastern Blooms stamp set from Stampin' Up! The primary colors used in this project were Rich Razzleberry and Chocolate Chip. If you have never made a gate fold card, you should definitely give it a try!

If you would like a Project Instruction Sheet, CLICK HERE and view Project 037_Gate Fold with Animal Stories

Saturday, August 21, 2010

Green House Gala with Fifth Avenue Floral


This is the last project in the Fifth Avenue Floral series. I really love the simplicity of this card. This card uses the Greenhouse Gala Designer Series Paper from Stampin' Up! I love this set of papers. The colors used in this project was Pear Pizzaz and Baja Breeze. These colors look wonderful together. Finally, I used the Top Note die to stamp on. If you don't have a Big Shot yet, you have to get one. You will love it!

Thursday, August 19, 2010

Kind with Fifth Avenue Floral

Happy Thursday everyone! I got a little behind in posting. I've been super busy. Anyway, here is another card using the Fifth Avenue Floral stamp set from Stampin' Up! The card also uses Baroque Motifs for the "Kind" sentiment. I added a little pizazz by using glitter with this project. I typically don't use glitter, but I thought it worked for this card. You have to be careful with glitter. Too much can take away from the simplicity of the card.

Sunday, August 15, 2010

Spotlighting Fifth Avenue Floral

This week's projects will feature Fifth Avenue Floral from Stampin' Up! I really like this stamp set because you can stamp an image and leave it the way it is or you can color it in with stampin' writer markers or watercolor pencils. In this project, I used a spotlighting technique. Spotlighting is where just one part of an image is colored in to draw attention to the detail of the image. This project aslo uses the Wonderful Favorites stamp set from Stampin' Up!

If you would like a Project Instruction Sheet, CLICK HERE and view >>Project 036_Spotlighting Fifth Avenue Floral

Friday, August 13, 2010

May Your Frosting Be Thick with Circle Circus


This is the final project I will be using that focuses on the Circle Circus stamp set from Stampin' Up! This card also uses the Birthday Bliss stamp set from Stampin' Up! for the sentiment. The colors used in this card was Cherry Cobbler, Basic Black and Whisper White. Cherry Cobbler is one of my favorite new colors from Stampin' Up! I can't wait to use more of it in the fall. The masking technique was used in this project as well. Masking is a technique of covering a stamped image so that other images may be placed partly over it without the overlapping area being visible. This technique will add depth and perspective to your art. I hope you enjoy!

Wednesday, August 11, 2010

Just For You with Circle Circus

I'm telling you, you could make a card for nearly every type of occassion if you had the Circle Circus and Teeny Tiny Wishes stamp set from Stampin' Up! I love all the colors used in this project. The card uses Rich Razzleberry and Melon Mambo. I do have to admit though, I did use some retired Designer Series Paper for this card. I'm really trying to use it all up. I love Designer Series Paper from Stampin' Up! so I always buy way to much of it. Have a great day!

Sunday, August 8, 2010

Circle Circus Accordion Card

This week, I am featuring the Circle Circus stamp set from Stampin' Up! This is my go to stamp set and it is one of my favorites. I really like the versatility of the stamp set. It can be used for holidays (like Christmas which you will see in a few weeks) and can even be used to make a masculine card which has always been a challenge for me.

I made this card for a friend of mine because she did a huge favor for me. This is an accordion folded card. Each "page" of the card had a different thank you sentiment. At the end, I put a small pocket that can be used for a gift card. In this project, I made a coupon for her to take her out to lunch. What I really like about this card is all of the details. The details of a card is really what makes the card special. I hope you enjoy.

If you would like a Project Instruction Sheet, CLICK HERE and view Project 035_Circle Circus Accordion Card

Friday, August 6, 2010

Wonderful Mother with Pocket Silhouettes

This is another versatile layout with the Pocket Silhouettes stamp set from Stampin' Up!. I used Cajun Craze and More Mustard as the primary colors for this card. I also used Stampin' Up! white embossing powder to create the images on the squares. The sentiment was created with the Wonderful Favorites stamp set from Stampin' Up!. This is a fast layout and could be used for nearly every occassion.

Tuesday, August 3, 2010

Thanks So Much with Pocket Silhouettes


What a long day! I wasn't sure if I was going to get to posting tonight on my blog or not. It had been awhile since I had done a card with an emphasis on red. This card uses Real Red which is a gorgeous color. I hope to use it in my Christmas cards this year (yep, I'm already thinking about Christmas). This card uses the Pocket Silhouettes stamp set as well as the Beautiful Wings embosslit from Stampin' Up!

Sunday, August 1, 2010

Slider card with Pocket Silhouettes

This week's postings will focus on projects made with the Picket Silhouettes stamp set from Stampin' Up! Pocket Silhouettes is a set of six stamps and it is a very versatile set. Two of the stamps from this stamp set are sentiments so you can make an entire card with just one stamp set.

This project is a slider card. When you pull on the ribbon, the inside of the card pulls out and has a greeting. This type of card is simple to make and is quite impressive to give someone for any occassion. This project also used the Stampin' Up! Big Shot as well as the Stampin' Up! Birds and Blooms sizzlits. I also used the Eyelet Border punch. The border punches from Stampin' Up! are a great way of dressing up your projects without using ribbon.

If you would like a Project Instruction Sheet, CLICK HERE and view Project 034_Slider card with Pocket Silhouettes

Saturday, July 31, 2010

Tart and Tangy Birthday Card and Gift

This was a birthday card I made for a friend of mine at work. She really likes lemon drops and I wanted to create something that had a citrus feel. The Tart and Tangy stamp set from Stampin' Up! was perfect for this project. I also filled a mason jar with lemon heads. The flower on top of the jar are scalloped circles that I cut at each scallop to create petals. The sentiment is from the Curvy Verses stamp set and I also used one of the new embossing folders from Stampin' Up!

Friday, July 30, 2010

Wonderful Friend with Awash with Flowers

This is the final card in the Awash with Flowers series. The background color of the card is Rich Razzleberry. I also embossed this piece with one of the texturz plates with Stampin' Up! I also used Pretty in Pink and Early Espresso cardstock and ink in this project. The sentiment uses the Wonderful Favorites Stampin' Up! stamp set; and the sentiment is stamped on a Top Note die.

Wednesday, July 28, 2010

Make a Wish with Awash with Flowers

I really like how this card turned out. I like the colors and all of the layering. This card uses the Awash with Flowers and Birthday Bliss stamp sets from Stampin' Up! The colors are Old Olive, Melon Mambo and Pumpkin Pie. I would have never thought to put these colors together but they really work well together.

PS - Stampin' Up! is running a promotion right now for hostesses. You should call me about hosting a workshop!

Sunday, July 25, 2010

Awash with Flowers Favor Cone

I am changing the format of my blog a little bit. Each week I will be featuring either a stamp set or a theme. This week I am feature the Awash with Flowers stamp set from Stampin' Up! This is a two-step stamp set and come with 18 stamps. I really love this stamp set and you should check it out in the Stampin' Up! Idea Book and Catalog.

This project is a favor cone. You could put fun little treats inside and give them away as gifts or favors at a party. The colors used in this project are Baja Breeze, Basic Grey and Whisper White. The flower is made from scallop circles.

Friend to Friend with Beautiful Wings (Sketch Challenge 290)

I hope everyone is having a fantastic weekend. I made this card for Splitcoast's Sketch Challenge 290. I'm trying to use up some of my retired paper. I recently got a few of the border punches from Stampin' Up! These punches are fantastic. I have been trying not to embellish my card with ribbon every time. The border punches are a great replacement! This project also uses the Beautiful Wings embosslit and the Vintage Wallpaper embossing folder from Stampin' Up!

Saturday, July 24, 2010

Paper Bag Scrapbook Album

I am pretty proud of this creation. It is a paper bag scrapbook album. The use of brown paper bags for cards and scrapbooks is becoming quite popular. I have been wanting to try to make a paper bag scrapbook for quite some time now. It is really easy and would make a great gift for someone. The paper bag scrapbook also has lots of places to store extra photos and journaling. You should really give it a try!

Friday, July 23, 2010

Medallion Birthday Card

I love the Medallion stamp from Stampin' Up! It makes beautiful cards in a short amount of time. I also, for the first time, used some Hodgepodge Hardware from Stampin' Up! Hodgepodge Hardware makes embellishing your cards and scrapbooks super easy. This project also used the Teeny Tiny Wishes stamp set from Stampin' Up!

If you would like a Project Instruction Sheet, CLICK HERE and view Project 031_Medallion Birthday Card

Tuesday, July 20, 2010

You're On My Mind with Upsy Daisy

When I looked at most of the cards I have made, I realized that I rarely use the color green. It isn't that I don't like green--I just happen to like other colors better. :-) Since I didn't have many cards that used green, I challenged myself to make a project using green as the primary color. I also wanted to do a really clean and simple card, and I think this fits the bill. This card uses the Upsy Daisy stamp set from Stampin' Up!

If you would like a Project Instruction Sheet, CLICK HERE and view Project 030_You're On My Mind with Upsy Daisy

Thank You for Your Friendship with Awash with Flowers (Sketch Challenge 289)

I made this card as part of a sketch challenge. CLICK HERE to go to the original sketch. Anyway, I rarely do challenges, but I had one heck of a day and needed some inspiration. This card uses the Awash with Flowers stamp set from Stampin' Up! The sentiment is from the Stampin' Up! set Upsy Daisy. I also used a bargello background. Bargello is a type of needlepoint embroidery consisting of upright flat stitches laid in a mathematical pattern to create motifs. The name originates from a series of chairs found in the Bargello palace in Florence, which have a "flame stitch" pattern (Thanks Wikipedia!). Anyway, I typically don't like cards with a lot of straight edges, and the layout of this card is a bit out of my comfort zone; however, I am really happy with how this card turned out.

Sunday, July 18, 2010

Curvy Verses Birthday Card

I cannot say enough how much I love the Beautiful Wings embosslit from Stampin' Up! It is so versatile. You can make a whole card with the embosslits as a focal point or you can use them to accent a card. I also used one of the new embossing folders from Stampin' Up! The one I used for this project was the square lattice. The embossing folders really add a lot of character and dimension to your projects. Finally, I also used the Curvy Verses stamp set from Stampin' Up!

If you would like a Project Instruction Sheet, CLICK HERE and view Project 029_Curvy Verses Birthday Card

Thursday, July 15, 2010

Circle Circus Birthday Celebrations

The new color coach from Stampin' Up! is amazing. I would have never thought of putting Basic Grey, Old Olive and Melon Mambo together on a card, but it totally works and looks amazing. The color coach from Stampin' Up! not only has a swatch for every color of cardstock and ink, but it also has 2-3 suggested color combinations. It takes the guess work out of trying to figure out what colors look good together. I don't know how many times I have ripped a card apart because I didn't like how the colors looked together. The Stampin' Up! color coach completely resolves this problem. This project also uses the Circle Circus and Upsy Daisy stamp set from Stampin' Up!

If you would like a Project Instruction Sheet, CLICK HERE and view Project 028_Circle Circus Birthday Celebrations

Tuesday, July 13, 2010

Happy Birthday with Circle Flowers

I really like making embellishments from Stampin' Up!'s Designer Series Paper (DSP). These circle flowers are easy to make. Since they are made with DSP, they can coordinate to any project you make. In addition to being a great embellishment for cards, these circle flowers would look great on a scrapbook page or 3-D object. I also used the Teeny Tiny Wishes stamp set from Stampin' Up! I know I've said this before, but if you don't have this stamp set, you have to get it!

If you would like a Project Instruction Sheet, CLICK HERE and view Project 027_Happy Birthday with Circle Flowers

Monday, July 12, 2010

Upsy Daisy Birthday Celebrations

This project used a reverse embossing technique. I embossed with white embossing powder onto white cardstock. Afterwards, I sponged color around the embossed image. This project uses the Upsy Daisy stamp set from Stampin' Up! This stamp set has become one of my favorites!

If you would like a Project Instruction Sheet, CLICK HERE and view Project 026_Upsy Daisy Birthday Celebrations

Saturday, July 10, 2010

I Heart Hearts Love Card

I made this card with a stamp set I just got. It is the I {Heart} Hearts stamp set from Stampin' Up! This is my first set of the clear-mount stamps. I must admit, I was a bit hesitant at first about these stamps. However, after using them for the first time I absolutely love them. They make two step stamping so much easier and take up less space in my craft closet. I highly recommend giving them a try if you haven't yet.

If you would like a Project Instruction Sheet, CLICK HERE and view Project 025_I Heart Hearts Love Card

Thursday, July 8, 2010

Extreme Surfboard Birthday Card

This was a really fun card to make. I used compressed air and reinkers to create the background on this card. The only thing I would have done differently would have been to use dimensionals to pop out the circle images. This card uses the Extreme Surfboard and Teeny Tiny Wishes stamp sets from Stampin' Up!

If you would like a Project Instruction Sheet, CLICK HERE and view Project 24_Extreme Surfboard Happy Birthday Card

Wednesday, July 7, 2010

Medallion Wishes Card

Last week I really wanted to make a card that used a technique that I have never tried before. The result was this card which uses the baby wipe technique. I applied the baby wipe technique with the Medallion and Heard from the Heart stamp set from Stampin' Up! The baby wipe technique is super easy and creates unique interest to your card. I've included instructions on how to do the baby wipe technique on the Project Instruction Sheet.

If you would like a Project Instruction Sheet, CLICK HERE and view >>Project 023_Medallion Wishes Card

Tuesday, July 6, 2010

Any Occassion Trendy Trees Card

This card is bright and cheerful! I made it the weekend before I went on vacation so you can tell I was definitely in good spirits when I made it. The card uses the Trendy Trees stamp set from Stampin' Up! This was my first card I've used the sponge technique on.

If you would like a Project Instruction Sheet, CLICK HERE and view Project 022_Any Occassion Trendy Trees

Monday, July 5, 2010

Happy Birthday with Animal Stories

I made this card for my second cousin's 1st birthday. I love the colors I used in this project. The card uses Stampin' Up!'s Elegant Eggplant, Perfect Plum and Old Olive as well as the Animal Stories stamp set from Stampin' Up! I really like the layering and the simplicity of this card.

If you would like a Project Instruction Sheet, CLICK HERE and view Project 021_Happy Birthday with Animal Stories

Sunday, July 4, 2010

Quick and Simple Birthday Bliss Card

This is a really quick and simple birthday card. It uses the Birthday Bliss stamp set from Stampin' Up! I made this card in approximately 15 minutes. Sometimes it's really nice to make a clean, simple and quick card.  At times, I try to over think card designs. Clean and simple cards can make a big impact. I always remember what my designer friend Linda tells me, "White space is a design element as well." That means that we don't have to cram a whole bunch of stuff onto a card just to take up space.

If you would like a Project Instruction Sheet, CLICK HERE and view Project 020_Birthday Bliss

Saturday, July 3, 2010

Kindness with Beautiful Wings Card

I made this card with some of the extra butterflies I had with the previous project I posted. The butterflies were made with the Beautiful Wings embosslit from Stampin' Up! If I haven't mentioned it yet, I love the beautiful wings embosslit. I also used the Heard from the Heart stamp set from Stampin' Up! This card is quick and easy!!

If you would like a Project Instruction Sheet, CLICK HERE and view Project 019_Kindness Beautiful Wings Card

Thursday, July 1, 2010

Just For You With Beautiful Wings

I had a lot of fun making this card. I love butterflies and the Beautiful Wings embosslit from Stampin' Up! makes this card very easy to make. Just like many of my cards, this could be used for other occassions.

If you would like a Project Instruction Sheet, CLICK HERE and view Project 018_Just For You Beautiful Wings

Wednesday, June 30, 2010

Recessed Window Card with Eastern Blooms

This Month's Feature Project is a Recessed Window Card. This technique takes a little time but it is a great way to show off a beautifully stamped image. It is also a great way to show off Stampin' Up!'s Designer Series Paper. This project used the Eastern Blooms stamp set from Stampin' Up!

For a Project Instruction Sheet, CLICK HERE and view Featured 003_July2010_Recessed Window Eastern Blooms

Tuesday, June 29, 2010

On a Pedestal Stair Step Card


This was a fun technique to try out with the On a Pedestal stamp set from Stampin' Up! The stair step card can really wow people and it doesn't take long to make at all. It's also a great way to break up the monotony of typical bi-fold cards.

For a Project Instruction sheet, CLICK HERE and view Project 017_Stair Step On a Pedestal Birthday Card

Sunday, June 27, 2010

Fourth of July Treat Basket

This project accomplished two of my goals--use up some scraps and make a Fourth of July project. I did not have a Stampin' Up! stamp set that captured the Fourth of July feeling, but I did have lots of red, white and blue cardstock scraps. Strips of cardstock were woven together to create this basket. You can use any colors you like and make this basket for any holiday or occassions.

If you would like a Project Instruction Sheet, CLICK HERE and view Holiday 004_July 2010_Fourth of July Treat Basket

Thursday, June 24, 2010

Top Note Herb Expressions Purse


I had a lot of fun making this project. This is a small purse that uses the Top Note Die by Sizzix from Stampin' Up! This purse also uses the Herb Expression stamp set from Stampin' Up! I also made a coordinating seed packet. The stamped images on the front of the purse and seed packet is a lavender stamp. I put lavender seeds inside the envelope and then put the envelope inside the purse. This makes for a super cute gift.

If you would like a Project Instruction Sheet, CLICK HERE and view Project 016_Top Note Herb Expressions Purse

Tuesday, June 22, 2010

Fifth Avenue Floral Scrapbook Page

The first blooms from my roses this year inspired me to create this scrapbook page. I used the Fifth Avenue Floral stamp set from Stampin' Up! to create a background for this scrapbook page. This page takes less than 20 minutes to create. This layout can be easily adapted to other stamp sets and photos.

If you would like a Project Instruction sheet, CLICK HERE and view Project 015_Fifth Avenue Floral Scrapbook Page 

Sunday, June 20, 2010

Happy Father's Day!!

This was another father's day card that I made for my dad. I didn't post it until today because this was the card I sent to my dad. My dad follows my blog so I didn't want him to see the card until he received it. Anyway, it is a relatively simple card, but I think it makes for a great Father's Day card. I hope my dad enjoyed the card because he truley is the most awesome dad out there! Love you dad!

If you would like a Project Instruction sheet, CLICK HERE and view Holiday 003_June2010_Fathers Day Card 2

Thursday, June 10, 2010

Happy Thoughts with Baroque Motif

This is one of my favorite cards I have made to date. It uses the Baroque Motif and Happy Thoughts stamp set from Stampin' Up! I seldom use the linen thread from Stampin' Up! to embellish my cards, but I really liked how this card turned out. This card also uses one of my favorite color combinations: Tempting Turquoise, Basic Black and Basic Grey from Stampin' Up!

If you would like a Project Instruction sheet, CLICK HERE and view Project 014_Baroque Motifs Happy Thoughts

Tuesday, June 8, 2010

Father's Day Card

Hello everyone! This is a really fun card to make for Father's Day. I don't know about you, but I have a tough time making masculine cards. For this card, I made an origami tie and used the "Happy Father's Day" sentiment from the Teeny Tiny Wishes stamp set from Stampin' Up! The Teeny Tiny Wishes stamp set is a must have set. It has 24 sentiments. If you don't have this stamp set, you must get it! I have another Father's Day card made, but I won't be posting it until after I have sent the card to my dad. My dad follows my blog so I don't want to spoil the surprise.

If you would like a Project Instruction sheet, CLICK HERE and view Holiday 002_June 2010_Fathers Day Card 1.

Sunday, June 6, 2010

Shadowed Upsy Daisy Card


This card displays a new technique that I have been wanting to try for quite some time. It uses punched images that layer over the primary image to create a shadowed effect. The card uses the Upsy Daisy and Think Happy Thoughts stamp sets from Stampin' Up! I also used the Bella Bleu Designer Series Paper from Stampin' Up!

Making this card for the first time did take a little practice. The primary issue that should be focused on when making this card is punching out the images in the correct location. When trying this technique, you may want to stamp some extra images to punch for practice or in case you make a mistake. Although it did take a little practice, it was a really fun card to make.

If you would like a Project Instruction Sheet, CLICK HERE and view Project 013_Upsy Daisy Birthday Card.

Thursday, June 3, 2010

Collage Friendship Card With Pocket Silhouettes


I hope everyone is having a great week. I am having a super busy week and I was afraid I wouldn't get to posting to my blog today. However, I was super efficient and got everything done! Anyway, today's featured card is a Collage Friendship card that uses the Pocket Silhouettes Stampin' Up! stamp set as well as the Stampin' Up! Beautiful Wings Embosslit. This project is a great way to use up smaller scraps of Designer Series Paper.

If you would like a Project Instruction Sheet, CLICK HERE and view Project 012_Collage Friendship Card.

Tuesday, June 1, 2010

A Quick and Simple Thank You Card with Coordinating Favor

I really love the Designer Series Paper from Stampin' Up! because it coordinates with the cardstock as well as their ink pads. This card and favor was made with the True Friend stamp set from Stampin' Up! In addition, I made a matching favor that holds six Hershey chocolate nuggets. Stampin' Up! is getting ready to go through a color renovation. Two of the colors used in this project, Dusty Durango and Crushed Curry, will no longer be offered. I will miss them as they have become two of my favorite colors. But, not to worry, Stampin' Up! will have NEW, beautiful colors in their upcoming catalog!

If you would like a Project Instruction Sheet, CLICK HERE and view Project 011_Thank You with True Friend and Matching Nugget Box.

Sunday, May 30, 2010

Notecards with Matching Tote

This was a fun little project to make using the Fifth Avenue Floral stamp set from Stampin' Up! The Fifth Avenue Floral stamp set has quickly become one of my favorites because of its versatility. You can use with embossing, watercolore and creating one of a kind backgrounds. This tote holds 3"x3" notecards. The Flight of the Butterfly stamp set from Stampin' Up! was also used in this project.

If you would like a Project Instruction Sheet, CLICK HERE and view Project 010_Tote and Cards.

Saturday, May 29, 2010

June's Featured Project - A Bargello Card and Coordinating Favor

This Month's Feature Project is a Bargello Card and coordinating mini milk carton. Bargello is actually a needlepoint and quilting technique that can be easily applies to striped Stampin' Up! Designer Series Paper. A Bargello pattern is made by simply cutting striped paper into varying widths and then staggering them to make a new pattern. Making a Bargello Card is also a great way to use scraps of left over paper.

This was a really fun card to make and didn't take as much time as I thought it would. This card used the Four Square Stampin' Up! stamp set along with the Stampin' Up! Birds and Blooms Sizzix dies as well as the Stampin' Up! Mini Milk Carton die.